This article provides practical sewing tips for repairing a torn slip dress, ensuring you can restore your favorite garment with ease and confidence using simple tools and techniques. Slip dresses are a staple in many wardrobes due to their versatility and elegance. However, they can be vulnerable to tears and rips. Understanding how to fix them can save you money and keep your favorite pieces looking their best.
What Are the Common Causes of Torn Slip Dresses?
Slip dresses can suffer from tears due to various reasons, including:
- Friction: Regular wear can cause fabric to wear thin at stress points.
- Snags: Jewelry or rough surfaces can catch on the delicate fabric.
- Improper Washing: Harsh detergents or incorrect washing methods can weaken the material.
How to Assess the Damage on Your Slip Dress?
Before you start any repairs, it’s essential to evaluate the damage:
- Identifying Small Tears vs. Large Rips: Small tears can often be repaired with simple hand sewing, while larger rips may require more advanced techniques.
- Checking the Fabric Type: Different fabrics, such as silk or satin, may require specific repair methods.
- Evaluating Seam Integrity: Inspect seams to determine if the tear is isolated or part of a larger issue.
What Tools Do You Need for Slip Dress Repairs?
Gathering the right tools is crucial for a successful repair:
- Essential Sewing Tools: Needles, thread, scissors, and pins are fundamental.
- Specialized Tools for Delicate Fabrics: Consider fabric glue or a sewing machine for intricate repairs.
Which Sewing Techniques Are Best for Fixing Tears?
Depending on the size and location of the tear, different sewing techniques can be applied:
- Hand Sewing vs. Machine Sewing: Hand sewing is great for delicate repairs, while machine sewing offers speed and strength.
- Using Fabric Glue for Quick Fixes: For minor tears, fabric glue can be a fast and effective solution.
How to Patch a Torn Slip Dress?
Patching can be both functional and stylish:
- Choosing the Right Patch Material: Select a patch that matches your dress’s fabric and color.
- Steps to Sew a Patch Effectively: Secure the patch with pins, sew around the edges, and ensure it’s firmly attached.
What Are the Best Practices for Preventing Future Tears?
To maintain the longevity of your slip dress, consider the following:
- Proper Washing Techniques: Always follow care labels and wash in cold water with gentle detergents.
- Storage Tips for Delicate Fabrics: Store your dress in a cool, dry place, preferably hanging to avoid creasing.
When Should You Seek Professional Help?
Sometimes, a DIY repair isn’t enough:
- Identifying Complex Repairs: If the damage is extensive or the fabric is particularly delicate, a professional tailor may be necessary.
- Finding a Reliable Tailor: Research local tailors and read reviews to ensure quality service.
By following these tips and techniques, you can confidently tackle repairs on your slip dress, restoring it to its former glory while saving money and extending its life.

What Are the Common Causes of Torn Slip Dresses?
Slip dresses are a timeless wardrobe staple, offering both elegance and comfort. However, they can easily become damaged, leading to unsightly tears. Understanding the common causes of tears in slip dresses is essential for prevention and effective repair. In this section, we will explore various factors contributing to fabric damage and provide insights on how to keep your slip dress looking pristine.
Wear and Tear: One of the primary reasons for tears in slip dresses is regular wear and tear. As with any garment, frequent use can lead to fabric fatigue, particularly in high-friction areas such as under the arms and along seams. Choosing the right size can help mitigate this issue, as an ill-fitting dress may stretch or pull in ways that weaken the fabric.
Fabric Type: The material of your slip dress plays a significant role in its susceptibility to tears. Delicate fabrics like silk and satin are more prone to snagging and ripping compared to sturdier materials. Understanding your dress’s fabric type will help you adopt appropriate care methods. Always check the care label for specific washing instructions to avoid damaging the fabric.
Improper Washing: Washing your slip dress incorrectly can lead to unexpected tears. Using harsh detergents, high temperatures, or aggressive washing cycles can weaken the fibers. It’s advisable to hand wash or use a gentle cycle with cold water, and to always air dry your dress to maintain its integrity.
Accidental Snags: Slip dresses can easily snag on jewelry, rough surfaces, or even other clothing. Being mindful of your surroundings and avoiding sharp objects can help reduce the risk of accidental snags. Additionally, consider removing jewelry before putting on or taking off your dress to minimize the chance of snagging.
Pest Damage: Insects, such as moths, can also cause significant damage to fabric. They are particularly attracted to natural fibers like silk and wool. To prevent pest damage, store your slip dress in a cool, dry place, and consider using moth repellents or cedar blocks in your wardrobe.
Improper Storage: How you store your slip dress can impact its longevity. Hanging it on a hanger can sometimes cause stretching or misshaping, while folding it improperly can lead to creases and potential tears. Always store your dress flat in a breathable garment bag to maintain its shape and prevent damage.
Seam Integrity: The seams of your slip dress are critical for its overall structure. Over time, seams can weaken due to stress or poor construction. Regularly inspecting the seams and addressing any loose threads or fraying can prevent larger tears from developing. Consider reinforcing seams with a sewing machine or hand-stitching if you notice any weaknesses.
By understanding these common causes of tears in slip dresses, you can take proactive measures to prevent damage and ensure your favorite garment remains in excellent condition. Whether it’s adjusting your washing techniques or being mindful of your surroundings, taking these steps can help you enjoy your slip dress for years to come.

How to Assess the Damage on Your Slip Dress?
When it comes to repairing a slip dress, assessing the damage is the first and most crucial step. Before you dive into any repairs, it’s essential to take a moment to evaluate the extent of the damage. This assessment will guide you in determining the best course of action and the techniques required to restore your beloved garment. Here’s how to effectively assess the damage on your slip dress.
One of the first things to consider is the size of the tear. Small tears can often be repaired with simple techniques, such as hand sewing or using fabric glue. These minor damages usually do not compromise the overall structure of the dress. On the other hand, large rips may require more extensive repairs, such as patching or even sewing machine techniques to ensure the dress maintains its integrity.
The type of fabric plays a significant role in determining the repair method. For instance, silk and satin require delicate handling, while cotton may be more forgiving. Knowing the fabric type can help you choose the right tools and techniques for the repair process. Always check the fabric care label for specific instructions.
Another important aspect of assessing damage is checking the integrity of the seams. Sometimes, a tear may be a symptom of a larger issue, such as seam failure or fabric wear. Inspect the seams closely to see if they are fraying or if there are any loose threads that need to be addressed. This evaluation can help you decide whether a simple repair will suffice or if more extensive work is needed.
Not all damages are easily repairable. After evaluating the size of the tear, the fabric type, and the seam integrity, you should assess whether the fabric is salvageable. If the damage is extensive or if the fabric is particularly delicate, it may be wise to consult a professional tailor. Sometimes, attempting a DIY repair on severely damaged fabric can lead to further complications.
- Look for discoloration: Check if the fabric has changed color around the tear, which might indicate wear.
- Feel the fabric: Run your fingers over the area to detect any roughness or thinning.
- Light test: Hold the dress up to the light to see if there are any weak spots that are not immediately visible.
Before you begin any repair work, it can be helpful to document the damage. Take clear photos of the tear and any related areas of concern. This documentation can serve as a reference for your repair process, and if you decide to seek professional help, it can provide valuable information to the tailor.
In conclusion, assessing the damage on your slip dress is a vital step in the repair process. By identifying the size of the tear, checking the fabric type, evaluating seam integrity, and determining the feasibility of repairs, you can make informed decisions that will help restore your dress to its former glory. Taking these steps will not only ensure a successful repair but also extend the life of your favorite garment.
Identifying Small Tears vs. Large Rips
When it comes to repairing a torn slip dress, understanding the nature of the damage is crucial. The distinction between small tears and large rips can significantly influence the repair method you choose. Each type of damage requires different approaches to restore your beloved garment effectively.
Small tears are typically less than an inch in length and may occur along seams or in less visible areas of the fabric. They can often be caused by snagging on jewelry or rough surfaces. Fortunately, these minor damages can usually be fixed with simple sewing techniques or even fabric glue.
- Hand Sewing: For small tears, a few hand stitches can be enough to pull the fabric back together. Use a needle and thread that matches the dress color for a seamless look.
- Fabric Glue: If you’re looking for a quick fix, fabric glue can be applied to small tears. Just ensure that the glue is suitable for the fabric type.
On the other hand, large rips are generally over an inch long and may involve a significant portion of the fabric. These damages often require more extensive sewing techniques to ensure the dress’s integrity is maintained. Large rips can occur due to wear and tear or accidents, and they may compromise the overall structure of the garment.
- Reinforcement: Large rips often need reinforcement. This can involve sewing a patch behind the tear to provide additional support.
- Machine Sewing: Using a sewing machine can help create a stronger and more durable repair for large rips. A zigzag stitch can be particularly effective in preventing further fraying.
Before beginning any repair, it’s essential to assess the extent of the damage. For small tears, a quick fix may suffice, while large rips may require a more detailed approach. Additionally, consider the fabric type; delicate materials like silk may need specific techniques to avoid further damage.
If the damage seems beyond your skill level or if the fabric is particularly delicate, it might be wise to consult a professional tailor. They can provide expert insights and ensure that your slip dress is repaired correctly, preserving its beauty and integrity.
In summary, identifying whether you are dealing with small tears or large rips is fundamental in determining the best repair method for your slip dress. By understanding the differences and applying the appropriate techniques, you can restore your garment effectively and enjoy it for years to come.
Checking the Fabric Type
When it comes to repairing a slip dress, understanding the fabric type is crucial. Each fabric, be it silk, satin, or another material, has its own unique characteristics that dictate the best repair methods. This knowledge not only helps in choosing the right tools and techniques but also ensures that the repair will be effective and maintain the dress’s aesthetic appeal.
Different fabrics have varying levels of durability, flexibility, and texture. For example:
- Silk: Known for its luxurious feel, silk is delicate and can easily fray or tear. Repairs should be done with a fine needle and silk thread to avoid further damage.
- Satin: This fabric has a smooth, glossy surface but can be prone to snagging. A careful approach is essential when mending satin to preserve its shine.
- Cotton: More robust than silk or satin, cotton can withstand a variety of repair methods, including machine stitching and hand sewing.
Before initiating any repairs, it’s important to identify the fabric of your slip dress. Here are some tips:
- Check the Care Label: Most garments come with a care label that specifies the fabric type. This is the easiest way to determine what you’re working with.
- Conduct a Burn Test: If the label is missing, a small burn test can help. Different fabrics react differently to fire; for instance, cotton will burn quickly and smell like paper, while silk will burn slowly and smell like hair.
- Feel the Texture: The texture of the fabric can also provide clues. Silk is smooth and cool to the touch, while cotton feels more textured and breathable.
Understanding the appropriate repair methods for different fabrics can make your efforts more successful:
- For Silk: Use a fine needle and silk thread. A hand stitch is often preferable to avoid damaging the fabric.
- For Satin: If the tear is small, consider using a fabric adhesive for a quick fix. For larger rips, a zigzag stitch can help prevent fraying.
- For Cotton: This fabric can handle most repair techniques, including machine sewing. A simple straight stitch can effectively mend tears.
Yes, delicate fabrics require extra care during repairs:
- Test First: Always test your repair method on a small, inconspicuous area to ensure it won’t cause further damage.
- Use Minimal Pressure: When sewing delicate fabrics, apply minimal pressure to avoid distorting the material.
- Consider Professional Help: For intricate repairs on high-value fabrics, consulting a professional tailor may be the best option.
In conclusion, understanding the fabric type of your slip dress is essential for effective repairs. By identifying the material and applying the appropriate repair methods, you can restore your dress while preserving its beauty and integrity.
Evaluating Seam Integrity
is a crucial step in assessing the damage to your slip dress. When a tear occurs, it’s essential to inspect the seams thoroughly, as this can provide significant insights into whether the tear is an isolated incident or indicative of a larger problem. Understanding the condition of the seams can help you determine the best approach for repairs and prevent future issues.
Seams are the backbone of any garment, providing structural support and shape. A tear near a seam may suggest that the fabric has undergone excessive stress or that the seam itself has started to fail. By inspecting the seams, you can identify potential weaknesses in the fabric and stitching that may need addressing.
- Look for Signs of Wear: Examine the seams for any fraying threads or loose stitches. These can be early indicators of seam failure.
- Check for Fabric Weakness: If the fabric around the seam feels thin or brittle, it may be more susceptible to future tears.
- Assess Stitching Quality: Ensure that the stitches are tight and secure. Loose stitching can lead to further tearing and compromise the integrity of the dress.
Addressing Seam Issues: If you discover that the seams are compromised, it’s vital to take action. Simple repairs can often restore the integrity of the seams:
1. **Reinforce Weak Seams:** Use a needle and thread to reinforce any loose stitches.2. **Sewing Techniques:** Consider using a zigzag stitch for added strength if you're using a sewing machine.3. **Fabric Glue:** For minor frays, fabric glue can help hold the threads together temporarily.
Moreover, if the tear is extensive and involves multiple seams, it may signify a more significant issue with the garment’s construction. In such cases, it might be wise to consult a professional tailor. They can evaluate the damage and suggest the most effective repair strategies, ensuring that your slip dress remains wearable and stylish.
Preventing Future Seam Damage: To maintain the integrity of your slip dress, it’s essential to adopt some preventive measures:
- Proper Washing: Always follow the care instructions for your dress, as improper washing can weaken seams.
- Gentle Handling: Be cautious when putting on or taking off your dress to avoid putting unnecessary stress on the seams.
- Storage Solutions: Store your slip dress in a cool, dry place, and avoid folding it in a way that puts pressure on the seams.
In summary, evaluating seam integrity is not just about fixing a tear; it’s about understanding the overall health of your garment. By being proactive and attentive to seam conditions, you can extend the life of your slip dress and enjoy it for many occasions to come.
Determining Repair Feasibility
When it comes to repairing a torn slip dress, understanding the feasibility of the repair is crucial. Not all damages can be easily repaired, and assessing the situation correctly can save you time, effort, and potentially your beloved garment. In this section, we will delve into the steps you should take to determine whether your fabric is salvageable or if it’s time to seek the expertise of a professional tailor.
The first step in determining repair feasibility is to carefully assess the damage. Look closely at the tear or hole in your slip dress. Is it a small rip, or has a larger section of fabric been compromised? Here are some key points to consider:
- Small Tears: If the tear is less than an inch long, it may be manageable with simple sewing techniques.
- Large Rips: For tears longer than an inch, particularly those that affect the fabric’s structure, a more complex repair may be necessary.
Different fabrics react differently to repairs. Knowing whether your slip dress is made of silk, satin, or another material will guide your approach:
- Silk: This delicate fabric may require a professional touch, especially if the tear is significant.
- Satin: While it can be repaired at home, ensure you use the right techniques to avoid further damage.
Inspect the seams surrounding the tear. If the seam is frayed or compromised, it may indicate a larger issue that requires professional attention. A strong seam is essential for the garment’s overall integrity, so:
- Reinforced Seams: If the seams are intact, you might be able to perform a straightforward repair.
- Weak Seams: If you notice that the seams are weak or fraying, it is advisable to consult a tailor.
Sometimes, the cost of attempting a DIY repair may outweigh the benefits, especially if the damage is extensive. Consulting a professional tailor can provide peace of mind, ensuring that your dress is repaired correctly. Here are some factors to consider:
- Repair Costs: Get a quote from a tailor to understand the financial implications.
- Value of the Dress: If the dress holds sentimental value, investing in professional repair might be worth it.
Before deciding, reflect on your sewing skills and the tools at your disposal. If you have experience with similar repairs and the right tools, you might be able to tackle the job yourself. However, if you feel uncertain, it’s best to err on the side of caution.
Ultimately, trust your instincts. If the damage seems beyond your capabilities, or if you’re unsure about the fabric type and repair methods, seeking a professional tailor is a wise choice. They can offer expert advice and ensure that your slip dress is restored to its former glory.

What Tools Do You Need for Slip Dress Repairs?
When it comes to repairing a torn slip dress, having the right tools is essential. The repair process can be significantly smoother and more effective if you gather the necessary equipment beforehand. This ensures that you achieve high-quality results, allowing you to restore your favorite garment with confidence.
To successfully repair your slip dress, you will need a variety of tools, each serving a specific purpose. Below is a comprehensive list of essential and specialized tools that can assist in your DIY sewing project.
- Needles: A variety of needles, including hand-sewing needles and machine needles, are crucial. Choose the appropriate needle size based on the fabric type.
- Thread: Select thread that matches the color and texture of your slip dress. This will help create a seamless repair.
- Scissors: A sharp pair of fabric scissors is necessary for clean cuts and precise trimming of frayed edges.
- Pins: Use pins to hold fabric pieces together before sewing, ensuring accuracy in alignment.
When working with delicate materials, consider investing in the following specialized tools:
- Fabric Glue: For quick fixes on small tears, fabric glue can be a lifesaver, providing a strong bond without the need for sewing.
- Sewing Machine: A sewing machine can expedite the repair process, especially for larger rips. Look for machines that offer different stitch options suitable for delicate fabrics.
- Iron and Ironing Board: Pressing your fabric before and after repairs can help eliminate wrinkles and ensure that the fabric lays flat.
Using the right tools not only enhances the quality of your repairs but also makes the entire process more enjoyable. Efficiency is key; having everything organized and within reach allows you to focus on the task at hand without unnecessary interruptions. Moreover, the right tools can help prevent further damage to your garment, especially when working with fragile materials.
When selecting tools, consider the following:
- Fabric Type: Different fabrics require different tools. Silk, for example, may need finer needles and lighter thread.
- Repair Complexity: For minor repairs, basic tools may suffice, but more complex issues might necessitate advanced tools.
- Your Skill Level: Choose tools that match your sewing experience. Beginners may benefit from simpler, user-friendly options.
Quality tools can be found at local craft stores, fabric shops, or online retailers. Look for reputable brands that offer durable products. Reading reviews can also help you select the best tools for your needs.
In summary, gathering the right tools is a critical step in the repair process of your slip dress. By ensuring you have the necessary equipment, you can tackle repairs with ease and confidence, leading to impressive results. Whether you are a seasoned seamstress or a beginner, the right tools will empower you to restore your favorite garments effectively.
Essential Sewing Tools
When it comes to repairing your beloved slip dress, having the right tools is essential for achieving a professional-looking result. Whether you’re a seasoned seamstress or a novice tackling your first DIY project, basic sewing tools are fundamental to your success. Below, we will explore the essential tools you need for any sewing repair, ensuring you are well-equipped to handle any situation.
To effectively repair a torn slip dress, you need a few key tools at your disposal. Here’s a list of the most important items:
- Needles: A variety of needles, including hand-sewing needles and machine needles, are crucial. Choose the right needle based on the fabric type; for instance, use a fine needle for delicate silk.
- Thread: Selecting the appropriate thread is vital. Ensure it matches the fabric color and type. Polyester thread is a versatile choice for most fabrics.
- Scissors: Invest in a good pair of fabric scissors for clean cuts. A smaller pair of snips can also be handy for trimming threads.
- Seam Ripper: This tool is invaluable for removing stitches or correcting mistakes without damaging the fabric.
- Measuring Tape: Accurate measurements are essential for ensuring your repairs are precise and neat.
- Fabric Clips or Pins: These help hold fabric pieces together while you sew, ensuring they don’t shift out of place.
Having the right tools not only makes the sewing process easier but also enhances the quality of your repairs. For example, using the correct needle can prevent fabric damage, while high-quality thread ensures durability. Investing in good tools can save you time and frustration, allowing you to focus on perfecting your sewing skills.
Different fabrics require different tools and techniques. Here’s a quick guide:
- Silk: Use sharp, fine needles and delicate thread to avoid snagging.
- Satin: Opt for a ballpoint needle to glide through the fibers without causing runs.
- Cotton: Standard sewing needles and polyester thread work well for cotton fabrics.
Yes, for those working with delicate fabrics, consider the following specialized tools:
- Fabric Glue: This can be a quick fix for minor tears without the need for sewing.
- Iron-on Patches: These can provide a seamless repair for small holes.
- Sewing Machine: A machine can speed up the process and provide more consistent stitches, especially for larger repairs.
To ensure your sewing tools last a long time, follow these maintenance tips:
- Keep Scissors Sharp: Regularly sharpen your fabric scissors to maintain clean cuts.
- Store Needles Safely: Keep needles in a magnetic holder or a needle case to prevent loss and injury.
- Clean Your Sewing Machine: Regular maintenance will keep your machine in optimal working condition.
By understanding and utilizing these essential sewing tools, you can confidently tackle any repair project, ensuring your slip dress looks as good as new. Remember, the right tools not only enhance your sewing experience but also contribute to the longevity of your garments.
Specialized Tools for Delicate Fabrics
When it comes to repairing delicate fabrics, having the right tools can make a significant difference in the quality and durability of your repairs. Investing in specialized tools not only simplifies the repair process but also enhances the overall appearance of your garment. Here are some essential tools to consider:
- Fabric Glue: This versatile adhesive is perfect for quick fixes on delicate fabrics. It allows you to bond fabric edges without the need for sewing, making it an ideal choice for small tears or hems. Ensure you choose a fabric glue that is washable and non-toxic to maintain the integrity of your garment.
- Sewing Machine: For those who frequently engage in sewing projects, a sewing machine can be a game-changer. Look for machines that offer a variety of stitch options, including zigzag and straight stitches, which are essential for repairing tears in delicate fabrics. A machine with adjustable tension settings can also help you adapt to different fabric types.
- Needles for Delicate Fabrics: Using the right needle is crucial when working with delicate materials. Opt for microtex or sharps needles, which are designed to penetrate fine fabrics without causing damage. This will ensure that your stitches are clean and do not create additional tears.
- Embroidery Scissors: These small, sharp scissors are perfect for snipping threads and trimming fabric edges with precision. Their fine tips allow you to work in tight spaces, making them essential for detailed repairs.
- Seam Ripper: A seam ripper is a handy tool for removing stitches without damaging the fabric. If you make a mistake while sewing, this tool can help you correct it easily, ensuring your repairs look professional.
In addition to these tools, consider investing in stabilizers or interfacing for added support during repairs. These materials can help reinforce areas that are prone to tearing, ensuring that your repairs last longer. When working on intricate repairs, take your time and follow best practices to achieve the best results.
Using specialized tools not only enhances the quality of your repairs but also allows you to express your creativity. With the right equipment at your disposal, you can tackle even the most challenging repairs on your delicate fabrics with confidence.

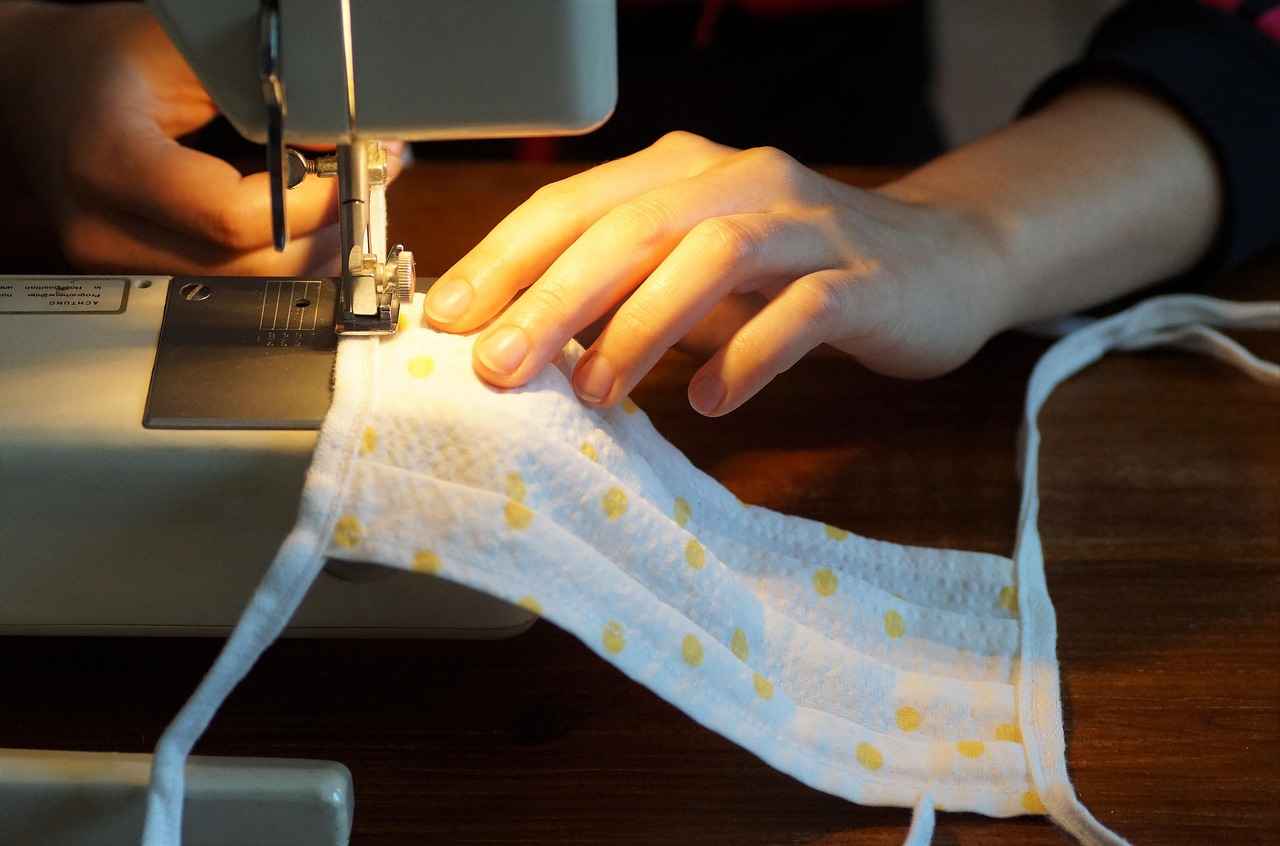
Which Sewing Techniques Are Best for Fixing Tears?
When it comes to repairing a torn slip dress, the choice of sewing technique is crucial for achieving a seamless repair. Different sewing methods can be applied based on the size and location of the tear, ensuring that the garment is restored to its original beauty. Below, we will explore various sewing techniques that can be effectively used for fixing tears in slip dresses.
For small tears, a few simple techniques can work wonders:
- Hand Sewing: Using a needle and thread, you can easily stitch small tears. This method allows for precision and control, making it ideal for delicate fabrics.
- Fabric Glue: For a quick fix, fabric glue can be a lifesaver. Apply a small amount to the tear, press the fabric together, and let it dry. This method is less time-consuming and requires no sewing skills.
Medium-sized rips may require more robust techniques:
- Machine Sewing: If you have access to a sewing machine, this method can provide a strong and durable repair. Use a straight stitch or zigzag stitch to secure the fabric.
- Patch Repair: For a stylish touch, consider using a patch. Choose a fabric that matches or complements your dress, and sew it over the tear. This method not only repairs the damage but also adds a unique flair to your garment.
For large rips, it is essential to ensure that the fabric is properly secured:
- Reinforced Stitching: Use a sewing machine to create reinforced stitches along the edges of the tear. This will help prevent further fraying and ensure the repair lasts.
- Using a Fusible Interfacing: For added strength, consider applying fusible interfacing to the back of the fabric before stitching. This provides extra support and helps keep the fabric from tearing again.
In some cases, DIY repairs may not suffice. If the tear is extensive, or if the fabric is particularly delicate, seeking the help of a professional tailor could be the best option. They possess the expertise and tools necessary to handle complex repairs without damaging your garment.
Choosing the right sewing technique for fixing tears in your slip dress is essential for achieving a successful repair. By understanding the size and location of the tear, you can select the most appropriate method, whether it be hand sewing, machine sewing, or patching. Remember, while some repairs can be easily accomplished at home, don’t hesitate to consult a professional for more challenging damages.
Hand Sewing vs. Machine Sewing
When it comes to repairing your slip dress, choosing between hand sewing and machine sewing is crucial. Each method has its own set of advantages and disadvantages that can significantly affect the outcome of your repair. Understanding these pros and cons will help you make an informed decision based on your specific needs and circumstances.
- Pros of Hand Sewing:
- Control: Hand sewing allows for greater precision, especially when working with delicate fabrics like silk or satin. You can easily maneuver the needle to ensure that every stitch is placed perfectly.
- Flexibility: This method is ideal for small repairs or intricate areas where a sewing machine might struggle to reach.
- Cost-Effective: Hand sewing requires minimal tools—just a needle, thread, and scissors—making it a budget-friendly option.
- Cons of Hand Sewing:
- Time-Consuming: Hand sewing can be significantly slower than machine sewing, especially for larger repairs.
- Durability: While hand-stitched repairs can be strong, they may not always match the durability of machine stitches, particularly under stress.
- Pros of Machine Sewing:
- Speed: Machine sewing is much faster, allowing you to complete repairs in a fraction of the time it would take to sew by hand.
- Consistency: A sewing machine provides uniform stitches that can enhance the overall appearance of the repair.
- Strength: Machine stitches are typically stronger and more durable, making them ideal for areas that will undergo frequent movement.
- Cons of Machine Sewing:
- Less Control: It can be challenging to achieve the same level of precision as hand sewing, especially in tight or intricate areas.
- Cost of Equipment: A sewing machine can be a significant investment, and it requires maintenance and knowledge to operate effectively.
In summary, the choice between hand sewing and machine sewing largely depends on the specific repair you are undertaking. If you are dealing with a small tear and want to ensure a delicate touch, hand sewing may be the best option. However, for larger repairs or when time is of the essence, machine sewing could be the more practical choice. Assess the nature of the damage, your skill level, and the tools at your disposal to make the best decision for your slip dress repair.
Using Fabric Glue for Quick Fixes
When it comes to repairing a torn slip dress, time and convenience are often of the essence. For minor tears, fabric glue can provide a quick and easy solution without the need for sewing. This approach is particularly beneficial for those who may not have sewing skills or tools readily available. Fabric glue is versatile and can adhere to various materials, making it an ideal choice for delicate fabrics such as silk and satin.
Fabric glue offers several advantages when it comes to repairing small tears:
- Speed: Applying fabric glue is a swift process, allowing you to fix your dress in just a few minutes.
- No Sewing Required: For those who lack sewing experience, fabric glue eliminates the need for needles and thread.
- Invisible Repairs: When applied correctly, fabric glue can create nearly invisible repairs, maintaining the aesthetic of your dress.
To ensure a successful repair, follow these simple steps:
- Clean the Area: Before applying glue, make sure the fabric is clean and dry. Remove any dirt or oils that could affect adhesion.
- Apply the Glue: Squeeze a small amount of fabric glue onto the torn edges, ensuring it covers the area evenly.
- Press and Hold: Press the torn edges together firmly for a few seconds to allow the glue to bond.
- Let it Dry: Follow the manufacturer’s instructions regarding drying time. Avoid moving the fabric until it is completely dry.
Not all fabric glues are created equal. Here are some tips to help you choose the right one:
- Check for Fabric Compatibility: Ensure the glue is suitable for the specific type of fabric you are working with.
- Look for Washable Options: If you plan to wash your dress after repair, choose a fabric glue that is washable and durable.
- Consider Drying Time: Some glues dry faster than others; select one that fits your timeline.
While fabric glue can be a lifesaver, there are pitfalls to watch out for:
- Overapplying Glue: Using too much glue can lead to stiffness in the fabric and visible patches.
- Ignoring Care Instructions: Always read the instructions on the glue bottle to ensure proper use.
- Not Testing First: If you’re unsure about the glue’s compatibility, test it on a small, inconspicuous area first.
While fabric glue is excellent for minor tears, there are situations where it may not suffice. For larger rips or damages near seams, traditional sewing methods may be necessary to ensure the integrity of the garment. In such cases, consider seeking the help of a professional tailor.
In summary, fabric glue is a practical solution for quick repairs on minor tears in slip dresses. By following the right techniques and avoiding common mistakes, you can restore your favorite garment with ease. Whether you are in a hurry or simply prefer a no-sew option, fabric glue can be your go-to tool for maintaining your slip dress’s beauty and functionality.

How to Patch a Torn Slip Dress?
Patching a torn slip dress can be an innovative and fashionable solution to repair your favorite garment while adding a personal flair. This technique not only restores the dress but also transforms it into a unique piece that reflects your style. Here, we will explore the process of patching, including the materials and techniques needed to achieve a seamless and attractive finish.
- Fabric Patches: Choose patches that complement the color and texture of your slip dress. You can opt for lace, cotton, or even denim patches for a contrasting look.
- Fabric Glue: A strong fabric glue can be used for quick fixes, especially for delicate materials.
- Needle and Thread: For a more secure attachment, hand sewing with a needle and thread is essential.
- Scissors: Sharp scissors are necessary for cutting the patch to the desired size.
When selecting a patch, consider the fabric type and color of your slip dress. For a subtle repair, choose a patch that closely matches the dress’s fabric. Alternatively, for a bolder statement, select a contrasting color or pattern that enhances the overall look.
- Assess the Damage: Before applying a patch, examine the tear’s size and location. This will help you determine the patch size and placement.
- Prepare the Patch: Cut the patch slightly larger than the tear to ensure complete coverage. Round the edges to prevent fraying.
- Secure the Patch: If using fabric glue, apply a thin layer to the back of the patch and press it onto the tear. For sewing, position the patch over the tear and use a straight stitch around the edges.
- Finishing Touches: Once the patch is attached, trim any excess threads and check for any loose edges. If necessary, reinforce the edges with additional stitches.
Iron-on patches can be a convenient alternative for patching slip dresses. These patches come with a heat-activated adhesive that bonds to the fabric when ironed. To use, simply follow the manufacturer’s instructions, ensuring the fabric is suitable for heat application. This method is quick and can be less intimidating for those new to sewing.
- Cost-Effective: Patching is a budget-friendly solution compared to purchasing a new dress.
- Unique Style: Each patch can reflect your personality, making your dress stand out.
- Eco-Friendly: Repairing instead of discarding contributes to sustainable fashion practices.
While patching can be straightforward, there are some common pitfalls to avoid:
- Choosing the Wrong Patch: Ensure the patch material is compatible with the slip dress fabric.
- Neglecting Fabric Care: Always check the washing instructions for the fabric to avoid damaging the patch.
- Skipping the Preparation: Properly preparing both the patch and the dress is crucial for a long-lasting repair.
Patching a torn slip dress not only revives the garment but also allows for creative expression. By following these steps and tips, you can effectively repair your dress while making it uniquely yours. With the right materials and techniques, your slip dress can continue to be a cherished part of your wardrobe.
Choosing the Right Patch Material
When it comes to repairing a torn slip dress, is essential for both functionality and aesthetics. A well-selected patch can seamlessly blend with the fabric and color of your dress, ensuring that the repair is both discreet and visually appealing. Here’s how to navigate this crucial step in your repair process.
Choosing the right patch is not just about covering a tear; it’s about maintaining the integrity and style of your garment. A patch that matches the fabric type and color of your dress will create a harmonious look, while an ill-suited patch can draw unwanted attention and detract from the overall appearance of your slip dress.
- Fabric Patches: These are made from the same material as your dress, such as silk or satin, and are ideal for a seamless repair.
- Iron-On Patches: These patches are easy to use and can provide a quick fix. However, ensure that the material can withstand the heat of the iron without damaging your dress.
- Decorative Patches: If you want to add flair to your dress, consider decorative patches with unique designs. Just ensure they complement the color scheme of your dress.
When selecting a patch, consider the following:
- Color Match: Choose a patch color that closely resembles the color of your dress. This will help the patch blend in rather than stand out.
- Fabric Compatibility: Ensure the patch material is compatible with the fabric of your dress. For instance, a silk patch on a satin dress can create an uneven texture.
- Patch Size: The patch should be large enough to cover the tear adequately but not so large that it looks out of place. A good rule of thumb is to select a patch that extends at least a half-inch beyond the tear.
Once you have selected the appropriate patch, follow these steps to apply it effectively:
1. Clean the area around the tear to remove any dirt or fabric frays.2. Position the patch over the tear, ensuring it is centered and straight.3. If using a fabric patch, sew it onto the dress using a needle and thread that matches the dress color.4. For iron-on patches, place a cloth over the patch and apply heat with an iron, following the manufacturer's instructions.5. Allow the patch to cool and check that it is securely attached.
Look for patches at local fabric stores or online retailers. Many craft stores offer a variety of patches that can cater to your specific needs, from simple fabric patches to more decorative options.
In summary, selecting the right patch material is a crucial step in the repair process for your slip dress. By considering color, fabric compatibility, and size, you can ensure that your repair is not only effective but also aesthetically pleasing. With the right materials and techniques, you can restore your favorite garment to its former glory.
Steps to Sew a Patch Effectively
When it comes to repairing a torn slip dress, patching can be a stylish and effective solution. Follow this step-by-step guide to ensure your patch is securely attached and blends seamlessly with the dress.
Before you begin, make sure you have the following materials at hand:
- Patch Material: Choose fabric that matches your dress in color and texture.
- Fabric Scissors: Sharp scissors will help you cut the patch and trim any frayed edges.
- Sewing Needle and Thread: Use a thread color that matches your dress for a discreet look.
- Fabric Glue (optional): For a quicker fix, fabric glue can be used instead of sewing.
Start by cleaning the area around the tear. Remove any loose threads or frayed edges to create a smooth surface. If necessary, iron the fabric gently to flatten it out, ensuring a better fit for the patch.
Using your fabric scissors, cut a patch that is at least 1 inch larger than the tear on all sides. This extra fabric will help secure the patch and prevent peeling over time. Make sure the edges are rounded rather than sharp to reduce the risk of snagging.
Place the patch over the tear, ensuring it covers the damaged area completely. You can use fabric glue to temporarily hold it in place while you sew, or pin it down if you prefer sewing directly. Ensure the patch is aligned properly, as this will affect the final look.
Now it’s time to attach the patch. Follow these steps:
- Start Sewing: Begin at one corner of the patch and use small, even stitches to sew around the edges. A whip stitch or a zigzag stitch is ideal for securing the patch.
- Maintain Tension: Keep the thread taut but not too tight, as this can cause puckering in the fabric.
- Overlap Stitches: As you sew, slightly overlap each stitch to ensure that the patch is firmly attached.
- Finish Securely: Once you’ve sewn all the way around the patch, tie off the thread securely and trim any excess.
After sewing, inspect the patch to ensure it is securely attached and looks good. If you used fabric glue, allow it to dry completely before wearing the dress. Iron the area gently to smooth out any wrinkles and help the patch blend in further.
To achieve the best results, consider the following:
- Choose a Patch Material Wisely: Using a patch that closely resembles the original fabric will help it blend in better.
- Practice Your Technique: If you’re new to sewing, practice on a scrap piece of fabric first to build your confidence.
- Be Patient: Take your time with each step to ensure a professional-looking repair.
By following these steps, you can successfully patch your slip dress, restoring its beauty and extending its life.

What Are the Best Practices for Preventing Future Tears?
When it comes to maintaining the beauty and integrity of your slip dress, preventive measures can play a crucial role. By taking the right steps, you can significantly enhance the longevity of your garment and minimize the need for future repairs. Here are some essential practices to consider:
Washing your slip dress correctly is vital for preserving its fabric and structure. Here are some tips:
- Read Care Labels: Always check the care label for specific washing instructions. Different fabrics may require different care.
- Use Gentle Detergents: Opt for mild, gentle detergents that are suitable for delicate fabrics to avoid damaging the material.
- Cold Water Wash: Washing in cold water helps prevent shrinkage and color fading, keeping your slip dress looking fresh.
- Avoid Overloading: When using a washing machine, ensure not to overload it. This prevents excessive friction that can cause tears.
Proper storage is just as important as washing. Here are some effective storage practices:
- Use Padded Hangers: Hanging your slip dress on padded hangers helps maintain its shape and prevents stretching.
- Keep It in a Dark Place: Exposure to sunlight can fade colors and weaken fabrics. Store your dress in a dark, cool area.
- Use Garment Bags: Consider using breathable garment bags to protect your dress from dust and potential snags.
- Avoid Folding: If possible, avoid folding your slip dress, as creases can lead to fabric wear over time.
Regularly inspecting your slip dress allows you to catch potential issues before they turn into significant problems. Here’s what to look for:
- Check for Loose Threads: Trim any loose threads immediately to prevent them from snagging on other fabrics.
- Inspect Seams: Look for any signs of fraying or wear in the seams, which can be a precursor to larger tears.
- Assess Fabric Condition: Regularly evaluate the fabric for any signs of thinning or damage, allowing for timely repairs.
Your daily activities can impact the wear and tear of your slip dress. Here are some lifestyle adjustments to consider:
- Avoid Rough Surfaces: Be cautious when sitting or leaning against rough surfaces that could snag the fabric.
- Choose Appropriate Footwear: Wearing shoes that are suitable for your outfit can prevent accidental tears from catching on heels.
- Be Mindful of Accessories: Jewelry and bags with sharp edges can snag on your dress, so choose accessories wisely.
By implementing these best practices, you can significantly reduce the risk of future tears in your slip dress. Taking the time to care for your garment not only enhances its appearance but also ensures that it remains a cherished part of your wardrobe for years to come.
Proper Washing Techniques
When it comes to maintaining the beauty and longevity of your slip dress, are essential. Slip dresses are often made from delicate fabrics like silk, satin, or chiffon, which require special care to avoid damage. In this section, we will explore effective methods for washing your slip dress correctly, ensuring it remains in pristine condition.
Understanding the significance of washing your slip dress properly can help you avoid common pitfalls that lead to fabric damage. Delicate fabrics can easily lose their shape, color, or texture if washed incorrectly. By following the right washing techniques, you can maintain your dress’s beauty and extend its lifespan.
- Hand Washing: This is often the safest method for cleaning a slip dress. Fill a basin with cold water and a gentle detergent. Soak the dress for about 10-15 minutes, gently agitating the water to clean the fabric. Rinse thoroughly with cold water to remove any detergent residue.
- Machine Washing: If you choose to machine wash your slip dress, use a delicate cycle with cold water. Place the dress inside a mesh laundry bag to protect it from snagging. Always use a mild detergent specifically designed for delicate fabrics.
Not all detergents are created equal when it comes to washing delicate fabrics. Look for a gentle, pH-balanced detergent that is free from harsh chemicals and fragrances. This will help preserve the color and texture of your slip dress.
After washing, how you dry your slip dress is just as important as how you wash it. Avoid wringing out the fabric, as this can cause it to lose its shape. Instead, gently press the water out by laying the dress flat on a clean, dry towel. Roll the towel up with the dress inside to absorb excess moisture.
- Air Drying: Hang your slip dress on a padded hanger away from direct sunlight to prevent fading. Ensure it is in a well-ventilated area to facilitate drying.
- Avoiding Heat: Never use a dryer or expose your slip dress to high heat, as this can cause shrinkage and damage to the fabric.
If your slip dress becomes wrinkled after washing, you may need to iron it. Always check the care label first. Use a low heat setting and place a cloth between the iron and the fabric to prevent direct contact. This will help avoid burns or shiny spots on the delicate material.
Proper storage is crucial for maintaining the quality of your slip dress. Always hang it in a cool, dry place. Use padded hangers to prevent shoulder bumps and avoid folding the dress, as creases can form and be difficult to remove.
In conclusion, washing your slip dress correctly involves a combination of gentle techniques and proper care. By following these guidelines, you can ensure that your favorite garment remains beautiful and wearable for years to come. Remember, the key to preserving your slip dress lies in gentleness and attention to detail.
Storage Tips for Delicate Fabrics
When it comes to maintaining the quality and longevity of your slip dress, proper storage is essential. Slip dresses, often made from delicate fabrics like silk or satin, require special attention to prevent damage. Here are some effective that can help you keep your favorite garments in pristine condition.
Storing your slip dress properly can significantly reduce the risk of accidental tears and prolong its lifespan. Delicate fabrics are susceptible to snags and tears if not handled correctly. By following best practices for storage, you can protect your investment and ensure your dress remains a staple in your wardrobe for years to come.
- Choose the Right Hanger: Use padded or wooden hangers to prevent stretching or creasing. Avoid wire hangers, as they can create indentations in the fabric.
- Use Garment Bags: Consider placing your slip dress in a breathable garment bag. This protects it from dust and potential snags while allowing air circulation.
- Keep Away from Direct Sunlight: Store your dress in a cool, dark place to prevent fading. Sunlight can weaken the fibers and alter the color of delicate fabrics.
- Avoid Overcrowding: Ensure there is enough space between garments in your closet. Overcrowding can lead to friction and potential tears.
If you prefer to fold your slip dress instead of hanging it, follow these steps:
1. Lay the dress flat on a clean, soft surface.2. Fold the straps inward to avoid creasing.3. Bring the bottom hem up to meet the bodice.4. Fold the dress in half, then roll it gently to minimize wrinkles.5. Store the rolled dress in a drawer or a dedicated storage box.
Delicate fabrics can attract moths and other pests, which can lead to unsightly holes in your slip dress. To protect your garment:
- Use Cedar Blocks: Place cedar blocks or sachets in your closet to deter moths naturally.
- Regularly Clean Your Closet: Keep your storage area clean and free of debris that may attract pests.
- Store Seasonally: If you won’t be wearing your slip dress for a while, consider storing it in a sealed container with moth repellents.
To maintain the integrity of your slip dress, be mindful of these common mistakes:
- Avoid Plastic Covers: Plastic can trap moisture and lead to mold or mildew. Opt for breathable materials instead.
- Don’t Store in Damp Areas: Humidity can damage delicate fabrics. Ensure your storage space is dry and well-ventilated.
- Skip the Ironing: If your dress is wrinkled, avoid ironing it directly. Instead, use a steamer to remove wrinkles gently, keeping the fabric safe.
By implementing these , you can significantly enhance the lifespan of your slip dress. Proper care and attention to detail will ensure that your favorite piece remains a cherished part of your wardrobe for many seasons to come.

When Should You Seek Professional Help?
When it comes to maintaining your favorite slip dress, understanding when to take matters into your own hands versus when to seek professional help is crucial. While many minor repairs can be handled through DIY methods, certain situations call for the expertise of a skilled tailor. This article will guide you through the signs that indicate it’s time to consult a professional, ensuring your beloved garment receives the care it deserves.
It’s important to assess the extent of the damage before attempting any repairs. Here are some indicators that your slip dress may require professional intervention:
- Large Rips or Tears: If the tear is more than a few inches long, it may compromise the structure of the dress.
- Fabric Fraying: When edges begin to fray, it can lead to further damage if not handled correctly.
- Seam Failures: If seams are coming apart, it may indicate a larger issue, especially if multiple seams are affected.
The fabric type plays a significant role in determining whether to DIY or seek help. Delicate fabrics like silk or chiffon require specialized techniques that may be beyond basic sewing skills. If your slip dress is made from such materials and has sustained damage, it’s advisable to consult a professional who can repair it without risking further harm.
Some repairs are simply too complex for DIY solutions. If you encounter any of the following issues, it’s time to reach out to a tailor:
- Alterations for Fit: If your dress doesn’t fit properly due to weight fluctuations or other reasons, a tailor can adjust it to perfection.
- Color Restoration: If your dress has faded or discolored, a professional can help restore its original vibrancy.
- Custom Patching: For unique or intricate patching needs, a tailor can create a seamless look that enhances the dress.
Once you’ve decided to seek professional help, finding a reliable tailor is essential. Here are some tips:
- Research Local Tailors: Look for reviews and recommendations from friends or online platforms to find reputable professionals.
- Assess Their Experience: Ensure the tailor has experience working with delicate fabrics and understands the intricacies of slip dresses.
- Ask for Samples: Request to see examples of their previous work to gauge their skill level and style.
Understanding the potential costs associated with professional repairs can help you make an informed decision. Prices can vary based on:
- Type of Repair: Simple repairs may cost less than extensive alterations.
- Fabric Type: Delicate fabrics may incur higher costs due to the special care required.
- Location: Tailors in urban areas may charge more than those in rural settings.
In conclusion, knowing when to seek professional help for your slip dress can save you from further damage and ensure that your garment remains a cherished part of your wardrobe. By recognizing signs of extensive damage, evaluating fabric types, and understanding the complexities involved in repairs, you can make informed choices about the care of your slip dress.
Identifying Complex Repairs
When it comes to repairing a torn slip dress, not all damages are created equal. Some tears can be easily mended at home, while others require a more delicate touch. is essential in determining whether a DIY approach is sufficient or if seeking the help of a professional tailor is the best option.
A complex repair typically involves significant damage that could compromise the integrity of the garment. This can include:
- Large Rips: Tears that span several inches or disrupt the overall structure of the dress.
- Fabric Type: Delicate fabrics like silk or lace may require specialized techniques that are best handled by professionals.
- Seam Failures: If the seams are coming apart, this may indicate a deeper issue that needs expert intervention.
While DIY repairs can be effective for minor tears, there are several reasons to consider a professional tailor for complex repairs:
- Expertise: Professional tailors have the training and experience to handle intricate repairs, ensuring that the fabric is not further damaged.
- Specialized Tools: Tailors often have access to high-quality tools and materials that can make a significant difference in the repair process.
- Time-Saving: A professional can often complete repairs more quickly than a novice, allowing you to enjoy your dress sooner.
It can be challenging to decide when to hand over your slip dress to a tailor. Here are some signs that you should consider:
- Extensive Damage: If the tear is larger than a few inches or if multiple areas are affected, it may be time to consult a professional.
- Delicate Fabrics: Fabrics that are fragile or have intricate designs should be handled by someone with expertise in fabric care.
- Uncertain Techniques: If you are unsure about the repair methods to use or lack confidence in your sewing skills, seeking professional help is advisable.
Once you’ve decided to seek professional help, finding a reliable tailor is crucial. Here are some tips:
- Research: Look for tailors with good reviews and recommendations. Online platforms and local community boards can be helpful.
- Consultation: Many tailors offer consultations where you can discuss the damage and get a quote before committing.
- Portfolio: Ask to see examples of previous work to ensure their style aligns with your expectations.
In summary, while minor repairs can often be tackled at home, complex damages to a slip dress should be addressed by a professional tailor. Their expertise and specialized tools can ensure that your beloved garment is restored to its former glory, allowing you to wear it with confidence once again.
Finding a Reliable Tailor
When it comes to maintaining your favorite slip dress, is essential. A skilled tailor can not only repair tears but also enhance the overall fit and appearance of your garment. In this section, we will explore how to identify a qualified tailor and the benefits of entrusting your slip dress to a professional.
Selecting a skilled tailor guarantees that your slip dress is in good hands. An experienced tailor understands the intricacies of different fabrics and can provide repairs that are both durable and aesthetically pleasing. Here are some reasons why choosing the right tailor matters:
- Expertise in Fabric Types: Different materials, such as silk and satin, require specific techniques for repairs. A knowledgeable tailor will know how to handle these delicate fabrics without causing further damage.
- Precision in Repair: A skilled tailor can perform repairs that are nearly invisible, ensuring that your dress looks as good as new.
- Alterations for Fit: Beyond repairs, a tailor can make necessary alterations to ensure your slip dress fits perfectly, enhancing your overall silhouette.
Finding a reliable tailor involves a few strategic steps:
- Ask for Recommendations: Start by asking friends, family, or colleagues for tailor recommendations. Personal experiences can guide you to trustworthy professionals.
- Check Online Reviews: Websites like Yelp or Google Reviews can provide insights into the quality of service offered by local tailors.
- Visit Tailors in Person: If possible, visit a few tailors to assess their work environment. A clean, organized shop often reflects a tailor’s professionalism.
- Request a Consultation: Many tailors offer consultations where you can discuss your needs. This meeting can help you gauge their expertise and communication style.
During your consultation, it’s important to communicate your specific needs clearly:
- Describe the Damage: Clearly explain the type of damage your slip dress has sustained, whether it’s a small tear or a larger rip.
- Ask About Techniques: Inquire about the methods the tailor would use for repairs. Understanding their approach can give you confidence in their skills.
- Discuss Costs: Get an estimate for the repairs and alterations. Knowing the costs upfront will help you make an informed decision.
A good tailor possesses certain qualities that set them apart:
- Attention to Detail: A meticulous tailor will pay close attention to every aspect of the repair, ensuring high-quality results.
- Strong Communication Skills: Effective communication is key. A good tailor will listen to your concerns and provide feedback on the best solutions.
- Experience with Similar Repairs: Look for a tailor who has experience working with slip dresses or similar garments, as they will be more familiar with the challenges involved.
In summary, finding a reliable tailor is crucial for ensuring your slip dress receives the care it deserves. By taking the time to research and consult with potential tailors, you can ensure that your garment is restored to its former glory. Remember, investing in a skilled tailor not only extends the life of your slip dress but also enhances your overall wardrobe.
Frequently Asked Questions
- What should I do if my slip dress has a small tear?
If your slip dress has a small tear, you can easily fix it with a needle and thread. Just make sure to choose a thread that matches the fabric color. For a quick fix, fabric glue can also work wonders!
- How can I prevent future tears in my slip dress?
To prevent future tears, always wash your slip dress in cold water and hang it to dry. Storing it in a cool, dry place and avoiding overcrowding in your closet will also help maintain its integrity.
- When is it necessary to seek professional help for dress repairs?
If the damage is extensive or involves delicate fabrics, it’s best to consult a professional tailor. They have the expertise to handle complex repairs without risking further damage to your beloved dress.
- What tools do I need for repairing a slip dress?
For basic repairs, you’ll need a needle, thread, and scissors. If you’re dealing with delicate fabrics, consider using fabric glue or a sewing machine for more intricate repairs.
- Can I use fabric glue for large tears?
While fabric glue can be useful for small tears, it’s not recommended for large rips. For larger damages, sewing is usually the best method to ensure a secure and lasting repair.


